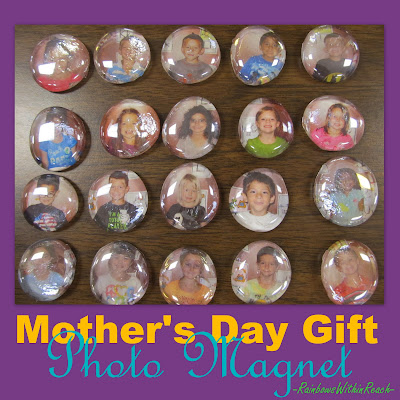
Here's a high-success, no-fail, easy-peasy DIY craft project: sure to please!!! You don't even need to be crafty! This simple project would be perfect for the daddy in your world, or the man in your world, whatever his title -- actually for any holiday, gift-giving occasion on down the family-calendar for that matter.
 |
| Do-it-Yourself Photo Magnets for Gift Giving |
Oo0o0oOdles of people came to visit here as a result of that image! YEAH!!
(You wanna go back to see the other Mother's Day ideas? Click here.)
Then there were questions. Like: "How did she do that?" I thought it would be helpful for me to 'try-it-myself' and let you look over my shoulder and hopefully all of your questions will be answered in the process.
First step: you need the glass baubles that I see are being marketed here as "Marble Accents." I was able to find a bag of these beauties at my local Dollar Tree Store in the craft section for, yup, you guessed it: ONE DOLLAR!! Don't ya just LUV your Dollar Tree? They came in a little mesh bag and my bag held 20 marble accent pieces. They are roughly an inch and a half to two inches across.
That's the little glass 'blobs' (professional term) let loose. The fun part is sorting through photos to find a just-right size for the glass accent gem. I had just unearthed a box of totally miscellaneous photos in our relocation earlier this month so I knew I was good to go. FUN TIMES!! These are our 'annual' pose-it-on-the-couch' photos and I'm guessing they are at least ten years old. Of course you could actually take 'new' photos for your keepsake. I just don't have my loved ones handy at the moment, so the boxed memories will suffice.
Easy peasy next step is to trace around the bauble onto the picture. The baubles are somewhat irregular, so you want to kinda-sorta be careful to keep your photo next to its own unique glass sphere (to make sure that they match back up again. No worries, its not really rocket science.)
Then the part that you're probably most intrigued by: the gluing. We didn't have any glue in our little north-woods summer place and Allen was out running errands. Yeah, cell phone! I asked him to pick up a little bottle of good ol' Elmers. He happened to bring home their 'School Glue' variety, but I'm sure you could use the regular -- just as easily.
I put a little circle of the glue around the outside edge of the photos.
Bingo-bango that's the whole process from start-to-finish! Happy refrigerator! Happy Father's Day Not-so-Crafty Pinterest person -- you can do this one!!! Honest!
I just had an earlier article I called "Father's Day Festivities" and there were two awesome bulletin board ideas in that post -- one could be converted into the cutest Father's Day card! Here's that click to go back in time. The other reason to click back there is I found a little 'poem' for your keepsake. You'll LUV it!
 |
| Father's Day Bulletin Board with Painted Feet |
-- Debbie --
LATE NIGHT BLOGGING THRILLLLLL!
My young, techno friends at KBN taught me how to do the text overlays on PicMonkey!!!!!!!
Oh happy, happy day!!!
What??? You don't know about the Kid Blogger Network?
At the very least follow our collaborative pin-board for a ton of ideas + inspiration!
LATE NIGHT BLOGGING THRILLLLLL!
My young, techno friends at KBN taught me how to do the text overlays on PicMonkey!!!!!!!
Oh happy, happy day!!!
What??? You don't know about the Kid Blogger Network?
At the very least follow our collaborative pin-board for a ton of ideas + inspiration!


Those magnets are great!! Thanks for the DIY tutorial! I am pinning this idea for next year!
ReplyDeleteLisa
Learning Is Something to Treasure
Lisa!!!!!!!!!!!!! I am just ever-so-thrilled with every comment! Way to make my day. I had fun pulling this together for folks who need things broken down. I am so very grateful for your pin!!!
DeleteDebbie
Note to self: must get over there to the TREASURE house!
Thanks so much for sharing!!! This will be such a nice gift!! :)
ReplyDeleteღDeAnne
First Grade and Fabulous
DeAnne, this must be my lucky day. Two comments on one post may truly send me over the moon. Thanks for your kind words!!! It is so simple and yet such a classic!!! ENJOY!!!
DeleteFabulous indeed!
Debbie
Ok. I have a quick question. I understand the glass marble part and the gluing of the photos to the marble. Where does the magnet come in? Are the photos printed on some sort of magnetic sheet? It is a great idea!
ReplyDeleteMelody. I just hot glued some round magnets to the back of the photos. Yup. Forgot to spell that out, didn't I?
DeleteIf you have magnetic sheets how that sounds cool!
Debbie
I was wondering the same thing melody.... She never mentions the magnet
ReplyDeleteHeather, It's cool that you're finding this article oh-so-much-later!
DeleteI just hot glued circular magnets to the backs of the photos -- for the refrigerator. There ya go!
Debbie